MyBlocks are the graphical version of subroutines. If you have a section of code you need to use in several places, or even in different programs, it's sometimes easier to "package" this code into a single block that you can just drag and drop into a program as needed. But this can be more than just a simple sequence of blocks: it is essentially a mini-program all its own, with the added ability to pass variables in and out of MyBlocks. In fact, once you've made a MyBlock and saved it, you can use it just like any of the other blocks: it's like you get to extend the language as you go! It saves reinventing code each time you program, and makes the programs much easier to understand and more readable. You can even "nest" MyBlocks, allowing you to build up very complicated blocks from simple building blocks (hmm... a lot like LEGO).
As an example, here's o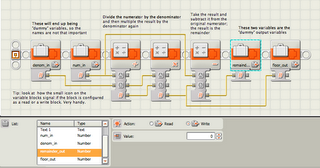 ne way to make a MyBlock that does the Modulo math function (if you've never heard of that, don't worry - it's very similar to finding the remainder of a long division problem). First I make a program to do this, but I make it in a special way. I start out and end with "dummy" variables for the inputs and outputs to the math operation I want to build. I named these variables something that made sense to me, but it wasn't neccessary, just a handy memory aid.
 Now I'd like to take the important math operations and package them up in a MyBlock, along with the all-important wiring. All I need to do is select all the blocks I want to end up in my new MyBlock, and then click on the "=" button in the toolbar at the top of the screen. That's it! The needed wiring will follow along. I usually think about this as "tearing" or "ripping" a MyBlock from a "wrapper" program.
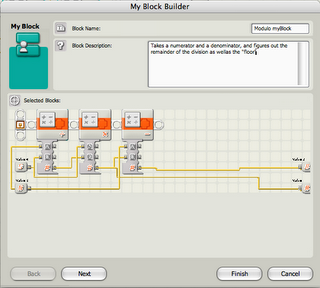 Immediately a dialog box pops up where I'm shown a preview of what's being put in the MyBlock, and I can add a name and a text description. The name will appear along the bottom of the MyBlock for easy identification both in the Custom pallet (where it will eventually end up) and in the actual program.
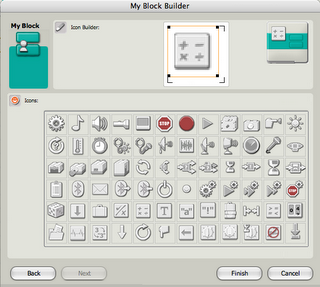 A second dialog box in this series allows me to drag and drop small icons onto a "blank" block icon, so I can design the look of the new icon for my block. I just click and drag icons from the pallet on the bottom into the white square, and I can move them around up there as well, allowing me to position more than one for more variety.
When I finish these dialogs,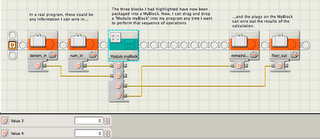 the editor creates the new MyBlock for me, obligingly replacing the blocks I selected in my original program with a copy of my newly-minted MyBlock, all wired in place and ready to go. Any wires that "crossed the boundries" of the MyBlock I creating have been replaced by plugs, so I can now wire values into and out of the MyBlock.
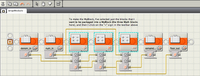
But what if you need to change something now? After all, I never get everything right the first time through. No problem, just double-click on the MyBlock and it obligingly opens up in its own window, where you can view what's there as well as edit it further if you want: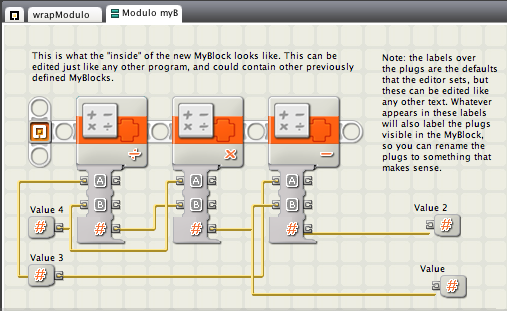
You can add comments, or add entire blocks, rewire things or move them around. About the only thing you can't do is add new wires in or out of the MyBlock: these need to be present at the creation of it (at least I've not yet found a way around this, if it exists).
These MyBlocks are saved for you, and then appear in the "Custom" pallet that Jim previously listed. There are even ways to change where they appear in the Custom pallet, so you can organize them as you see fit. You can also re-edit the icon or description of the MyBlocks later on.
Just to illustrate a slightly more complex MyBlock, here's the view inside a MyBlock that does a simple calculation for any calculator, but one noticably lacking on many small robots: sin(x), where x is an angle in degrees. This MyBlock returns the sin(x) times 1000 (why? Because the NXT uses only integer variables). It uses a version of the block we just created to streamline the calculation right near the beginning, as well as file operations (it reads from a table of values the help with the calculation).
--
Brian Davis
As an example, here's o
 ne way to make a MyBlock that does the Modulo math function (if you've never heard of that, don't worry - it's very similar to finding the remainder of a long division problem). First I make a program to do this, but I make it in a special way. I start out and end with "dummy" variables for the inputs and outputs to the math operation I want to build. I named these variables something that made sense to me, but it wasn't neccessary, just a handy memory aid.
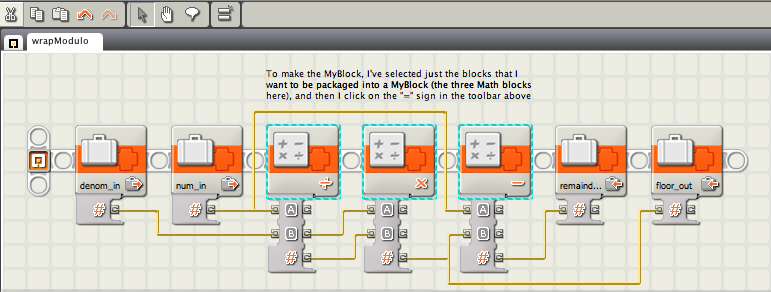 Now I'd like to take the important math operations and package them up in a MyBlock, along with the all-important wiring. All I need to do is select all the blocks I want to end up in my new MyBlock, and then click on the "=" button in the toolbar at the top of the screen. That's it! The needed wiring will follow along. I usually think about this as "tearing" or "ripping" a MyBlock from a "wrapper" program.
 Immediately a dialog box pops up where I'm shown a preview of what's being put in the MyBlock, and I can add a name and a text description. The name will appear along the bottom of the MyBlock for easy identification both in the Custom pallet (where it will eventually end up) and in the actual program.
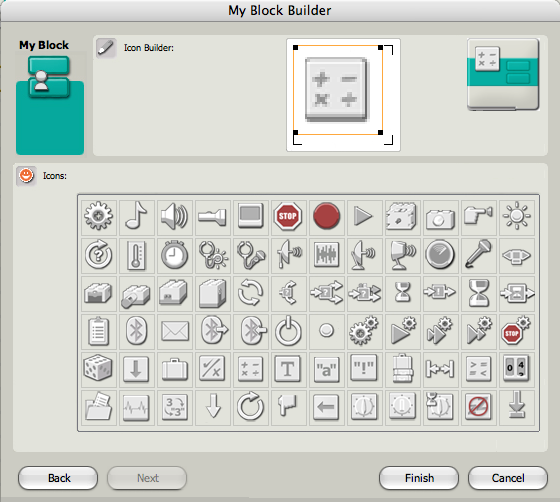 A second dialog box in this series allows me to drag and drop small icons onto a "blank" block icon, so I can design the look of the new icon for my block. I just click and drag icons from the pallet on the bottom into the white square, and I can move them around up there as well, allowing me to position more than one for more variety.
When I finish these dialogs,
But what if you need to change something now? After all, I never get everything right the first time through. No problem, just double-click on the MyBlock and it obligingly opens up in its own window, where you can view what's there as well as edit it further if you want:

You can add comments, or add entire blocks, rewire things or move them around. About the only thing you can't do is add new wires in or out of the MyBlock: these need to be present at the creation of it (at least I've not yet found a way around this, if it exists).
These MyBlocks are saved for you, and then appear in the "Custom" pallet that Jim previously listed. There are even ways to change where they appear in the Custom pallet, so you can organize them as you see fit. You can also re-edit the icon or description of the MyBlocks later on.
Just to illustrate a slightly more complex MyBlock, here's the view inside a MyBlock that does a simple calculation for any calculator, but one noticably lacking on many small robots: sin(x), where x is an angle in degrees. This MyBlock returns the sin(x) times 1000 (why? Because the NXT uses only integer variables).
d.png) It uses a version of the block we just created to streamline the calculation right near the beginning, as well as file operations (it reads from a table of values the help with the calculation).
It uses a version of the block we just created to streamline the calculation right near the beginning, as well as file operations (it reads from a table of values the help with the calculation).--
Brian Davis