Be gentle fair readers, this is the first time I've tried to blog anything. There's plainly a lot of interest on the programming environment (I hope to get back to studless construction later), but I thought I'd throw another example out. I used a variable and some simple structres (like Switch and Loop blocks, just covered by Jim) to show you one way to record the highest sound level from the sound sensor. Take a look:
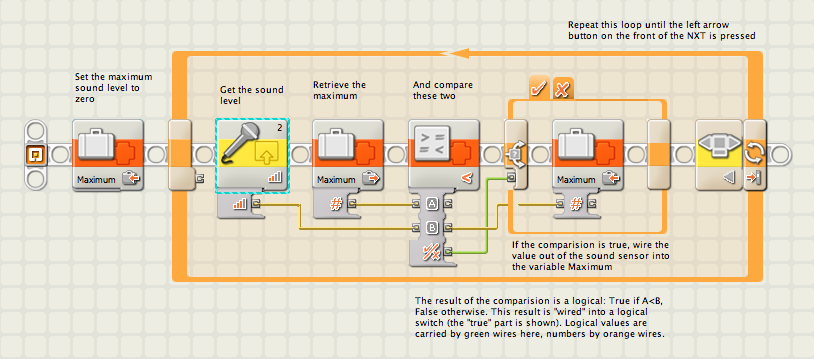
 The first thing I did was define a variable I called Maximum, to hold the highest sound level the robot senses. Then the program enters a loop (technically, a "loop until" type structure - it checks the exit condition at the end, just like the graphics imply). Inside the loop, I get the current value from the sound sensor (hooked to port #2 - the block shows you this right on the icon), and "wire" that value into a Compare block, that compares it to the current value of the variable. The result of that comparision is a logical condition: True or False. I then take that result, and wire it into a Switch block, allowing two different courses of action depending on what logical value the Compare block wired out. Finally, the loop checks to see if the "left arrow" button on the front panel of the NXT is pressed, and if it is it will exit the loop.
Notice all the comments? I didn't do that with a text editor after I took the screenshot, that's a built-in tool in the editor. Notice how wires are different colors? That way you can keep straight different types of information (numbers, logical, text). Wires can branch and connect one output plug to multiple input plugs, and the editor keeps you from wiring the wrong type of data in (try to connect a number to a logical? The editor won't let you, but instead display a "broken" wire). Notice the little "plug" near the beginning of the loop structure? That's a counter: I can wire out a number from there, that will increment every time through the loop. There's actually a lot of hidden stuff in simple program fragments like that. The Switch block, by the way, is shown here in "tabbed" view: by clicking on those two tabs at the top (the check for True, the X for False) and can see the two sequences of code that the Switch could execute. Not only is this a little less space-consuming, but it's the only way to make multi-case Switch statements.
--
Brian Davis