 Studded constructions can create half-offsets horizontally (using either “jumper plates”, Or things like the 2-hole 1x2 beams), and 1/3rd offsets vertically (plates) – what new tricks does studless have? Well, half-stud offsets are easy enough (I demonstrated another one in the “template”)… as is, actually, anything else!
Here’s where “breaking the mindset” of the studded LEGO world is sometimes difficult for me. Since an axle can be pushed through an axle hole by any amount, all sorts of offsets are allowed if you use axles to join things. For that matter, using this property of axles lets you make fairly rigid structures with any angle you want: just use axles to make adjustable elements!
 The red axle sliding through the red cross-block (also called an “axle joiner perpendicular”) makes an adjustable-length element in these structures. Another handy construction in this picture is the two-tone grey piece near the top. As shown, it’s a nice rigid way to connect two parallel beams… substitute a normal cross block for the dark grey piece on the left, and you have a half-stud offset again.
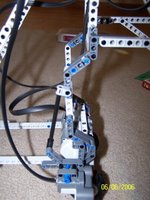
Here’s another more practical example. I recently built a NXTbot where the frame ended up with a whole lot of odd angles, but I still needed some way to direct the US sensor exactly where I wanted it: forward and parallel to the ground.
 The US sensor (it's visible upside down right at the bottom middle of the image), is attached to a structure the connects to the main robot only at a single friction pin (at the bend of the inverted L beam) and via a sliding linkage on the long black axle. As a result, I could position it just like I wanted - exactly parallel to the ground and facing forward, although the robot itself has no beams in this orientation.
--
Brian Davis