
If you're a programmer like me, your programs won't work perfectly when you run them the first time. Sometimes it's a simple mistake on the programmer's part, but sometimes the problem is not so obvious.
In some cases you can analyze part of your program by displaying some of the program's variables on the NXT screen. For example, you can do this to determine whether a sensor works or not.
Displaying such a number on the NXT screen is not very difficult, but it can be a bit cumbersome if there's multiple things you would like to display. To make it a little easier I'd like to share an old trick (a My Block) that will make it simple to do this.
The NXT screen will show "Sensor: 47" if the ultrasonic sensor measures 47.
Installation Instructions
- Just open the packed example program:
Click here to download. Be sure to open the file that's in the zip archive with the Mindstorms NXT-G 2.0 software. Alternatively, use "Right Click" and click "Save as" first. The My Block is included and will automatically be added to your other My Blocks.
Using the block
- Run the example to test your block and try it out. (Then just skip the info below).
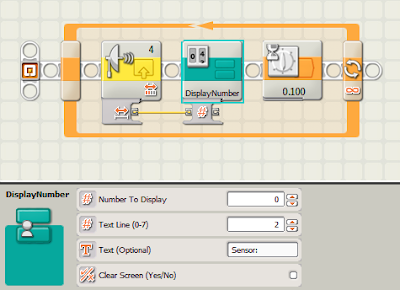
- Use the "Number to Display" setting to specify the number you would like to display. You would normally supply the value through a Data Wire as in the example.
- "Text Line (0-7)" specifies on which line the number should be displayed. 0 is at the top of the NXT screen, 7 is at the bottom.
- "Text (Optional)" lets you optionally add some text to the number. This is useful if there's multiple things you want to display on the screen. For example, putting "Sensor:" in the example results in "Sensor: 47" on the NXT screen if the value is 47.
- The block will always erase the text line in question before showing something new, but you can check the "Clear Screen (Yes/No)" to empty the whole screen if necessary.
---
Update: Steve Hassenplug reminded me of a custom NXT block (Not a My Block) that he made that does just the same (find it here).
Whether you want to use this block or the My Block is up to you. Steve's block can nicely be added to your other Action blocks, right next to the Display Block if you wish. The My Block on the other hand is easier to share because the person you share it with does not have to install a custom NXT block.
In some cases you can analyze part of your program by displaying some of the program's variables on the NXT screen. For example, you can do this to determine whether a sensor works or not.
Displaying such a number on the NXT screen is not very difficult, but it can be a bit cumbersome if there's multiple things you would like to display. To make it a little easier I'd like to share an old trick (a My Block) that will make it simple to do this.

The NXT screen will show "Sensor: 47" if the ultrasonic sensor measures 47.
Installation Instructions
- Just open the packed example program:
Click here to download. Be sure to open the file that's in the zip archive with the Mindstorms NXT-G 2.0 software. Alternatively, use "Right Click" and click "Save as" first. The My Block is included and will automatically be added to your other My Blocks.
Using the block
- Run the example to test your block and try it out. (Then just skip the info below).
- Use the "Number to Display" setting to specify the number you would like to display. You would normally supply the value through a Data Wire as in the example.
- "Text Line (0-7)" specifies on which line the number should be displayed. 0 is at the top of the NXT screen, 7 is at the bottom.
- "Text (Optional)" lets you optionally add some text to the number. This is useful if there's multiple things you want to display on the screen. For example, putting "Sensor:" in the example results in "Sensor: 47" on the NXT screen if the value is 47.
- The block will always erase the text line in question before showing something new, but you can check the "Clear Screen (Yes/No)" to empty the whole screen if necessary.
---
Update: Steve Hassenplug reminded me of a custom NXT block (Not a My Block) that he made that does just the same (find it here).
Whether you want to use this block or the My Block is up to you. Steve's block can nicely be added to your other Action blocks, right next to the Display Block if you wish. The My Block on the other hand is easier to share because the person you share it with does not have to install a custom NXT block.